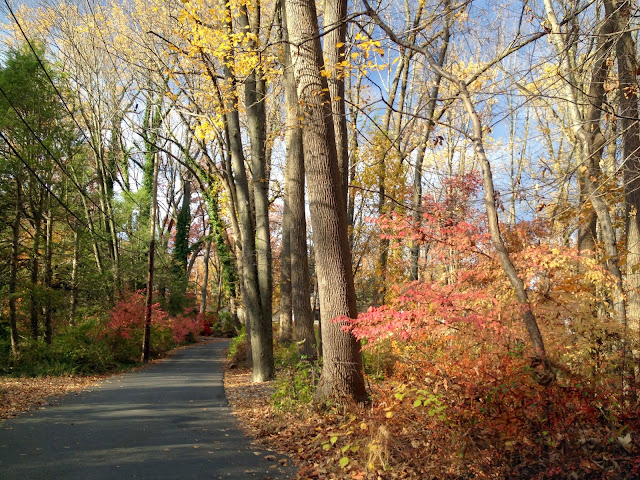
Look at the trees below. The autumn sunlight is steaming in from the side. The sun is not visible in these photographs. The sunlight creates light and shadow on the trees.
The trunks of the trees get smaller as they grow higher. The branches of the trees get smaller as they grow away from the trunk. The branches are angled upwards towards the sun. The higher you go on the tree the smaller the branches are. The branches eventually get so skinny that the lines come together and end in points. This is true for every tree in each of these pictures.


 |
Practice drawing trees following the steps on this worksheet. If you are having trouble, look at the video above, playing in a loop.Look at the worksheet below. Each composition has a foreground,middle-ground and background. Each picture has overlapping, a horizon and trees that get smaller and appear higher on the page as they get farther away. yet each picture is unique. Instead of merely copying the sample below, see if you can use the photographs to inspire an original composition, within the parameters of the assignment.  |
 |
| Once you have mastered drawing trees without leaves, practice placing larger trees at the bottom of the page, in the foreground, medium sized trees higher on the page in the middle-ground and the smallest trees up near the horizon line. Remember, the horizon line is where the earth meets the sky, so the roots of even the farthest away tree must be on or below the horizon line. Overlap the branches of the trees in the foreground with the trees in the middle ground to create a greater sense of depth. |
 |
| Next, start adding shadows to your trees. The light source for this assignment will be coming from the side. In the drawing above I selected a light source that is off the edge of the paper and to the right. I did not draw the sun in the picture. For this assignment, do not draw the sun. I added shadows, using the side of my pencil and a blending stomp, to the right hand side of each branch of all my trees. I used an eraser to make sure that the left hand side of each branch looked as if the light was hitting it. Before adding color, take a look at your picture. It should follow the directions of the assignment but need not look identical to the example. |
 |
| The final step involves adding color. In early autumn, before they turn brown, fall leaves are yellow, yellow-orange, orange, red-orange and red. These are analogous colors, which means that they are next to each other on the color wheel. Yellow and Red are primary colors. If you mix them together, you will create orange. Adding more red will create red-orange. Adding more yellow will create yellow-orange. |

Use transparent watercolors to add color to your picture. Mix the paint with water and practice painting with it on a separate piece of scrap paper. Scribble with pencil on your scrap paper and then paint over it. If you cannot see the pencil lines through the paint, add more water to your color in the mixing tray. You will know when the paint is transparent when you can still see the pencil lines through the color.
Gently dab transparent yellow paint where you want your leaves to have the light hitting them. Add some yellow-orange as you move away from the light. Gradually change the colors on each tree to go from yellow, through yellow-orange to orange to red-orange to red. If you are doing it correctly you will still be able to see the branches of the trees through the colors. Do not brush the colors on, instead dab them on to your paper with a wet brush, loaded with color. Dabbing the colors on instead of brushing them on to your paper will produce the texture of many fall leaves.
Next, add a brighter, yellower green to the grass for your foreground and a bluer green to the grass in your background. Green is made from the two primary colors yellow and blue.
 |
| When you mix yellow and blue, you create green. Adding more yellow will create yellow-green. Adding more blue will create blue-green. |
Putting yellow-green in the foreground will make the foreground appear brighter and nearer to the viewer. Adding blue-green to the background will make it seem farther away. Mix the colors in your background with plenty of water so they appear to fade off into the distance.
HOW WILL YOU BE GRADED:
Did you make trees with branches according to the directions?
Did you remember to add shadows but not include the sun?
VERY IMPORTANT:
If you have included the sun in your picture or made lollipop trees or trees with scribbles or cloud shapes on the top instead of branches, you will not be given any credit at all for your artwork. Your grade will be a zero.
The objective of this lesson is to teach students how to look at real trees and notice how they form branches and how those branches grow. Another objective of this lesson is to teach students how to use light and shadow in a landscape.
If you accidentally included the sun or drew lollipop trees, please take a new sheet of paper and follow directions instead.
RUBRIC:
Pencil drawing:
Trees have branches but no leaves-20 points
Drawing includes foreground, middle-ground, background and horizon line.The trees are higher up on the page and smaller the farther away they are. The smallest trees have roots on or below the horizon line. You must draw at least three trees, one in the foreground, one in the middle-ground and one in the background.-
20 points
Each tree is shaded in and has highlights, mid-tones and shadows- 20 points
You used overlapping to give your picture a sense of depth-
20 points
Your drawing is neatly and carefully drawn according to the directions and utilizes the entire page-
20 points
Rubric:
Watercolor Painting
You demonstrated that you knew the difference between transparent paint and opaque paint by mixing each color with water and practicing on a separate piece of paper. You used only transparent colors in your picture-
20 points
You demonstrated that you know how to mix colors by including yellow, yellow-orange, orange, red-orange and red in your fall foliage-
20 points
Your finished painting has a sense of light and shadow. It is easy to see where the light is coming from. The leaves on the light side are yellower than the leaves on the shadow side. 20 points
You used a brighter, yellower green for the grass in the foreground of your painting. You used a bluer, more watered down green in the background, near the horizon line.-
20 points
Your finished painting is carefully executed and neatly done. It is obvious that you were trying to make something that looks nice and that you are proud of. You were not simply playing with paint. You were creating art.-
20 points
 Claude Monet, The Avenue,
1878, Oil on canvas


If you are having trouble drawing trees with branches, even after looking at the worksheet and watching the video, try drawing along with this tutorial which also has a narration:
Advanced work:
Below is my photo collection of trees:
Here is my collection of sky
reference photographs:
Here is my album of autumn leaves:
Enjoy looking at the photographs for inspiration before creating your own original autumn landscape or take your camera for a walk and gather your own reference photographs. Now that you have demonstrated that you understand the basic elements of a landscape, enjoy creating your own beautiful autumn paintings.
Student Art Gallery